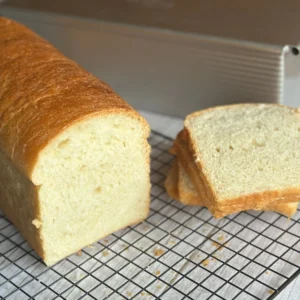
Potato Flake Sourdough Bread in a Pullman Loaf Pan
A Pullman loaf pan is perfect for baking a beautifully square, soft-crusted potato flake sourdough sandwich bread.
Equipment
- USA Bakeware Pullman loaf pan
- Kitchen aid stand mixer (optional, but makes the process easier)
- measuring cups and spoons
- Plastic Wrap or Beeswax Wrap
- Digital thermometer (optional, but allows you to check for doneness)
Ingredients
- 2/3 cup active potato flake sourdough starter
- 1 cup warm water around 90°F-100°F
- 1/4 cup sugar or 2 Tablespoons honey
- 5 tablespoons Mild Olive oil can also use coconut oil or melted butter
- 2 teaspoons salt
- 4 cups of bread flour
Instructions
- Make sure your potato flake sourdough starter is bubbly and active before baking. Feed it 8–24 hours before you plan to mix the dough to ensure it’s ready. A strong, active starter is essential for getting a good rise in your loaf. If your starter has been stored in the fridge, let it come to room temperature before using.
- In a large mixing bowl or stand mixer, combine the active starter, warm water, sugar (or honey), oil (or melted butter), flour and salt. If mixing by hand, stir with a wooden spoon until until a soft dough forms.
- Knead the dough for about 8–10 minutes by hand on a lightly floured surface or 5–7 minutes in a stand mixer with a dough hook. The dough should be smooth, slightly tacky, and elastic. Proper kneading helps develop gluten, which gives the bread its structure and chewiness.
- The dough should not be overly sticky on your hands. You might have a small amount of residue that sticks to your fingers, but it should be very easy to manage. If it is too sticky, add a small amount of flour at a time until you are able to handle it easier.
- Place the dough in a greased bowl, cover it with plastic wrap, and let it rise in a warm place for 4–6 hours, or until doubled in size. The rise time can vary depending on the temperature of your home and the activity of your starter.
- Lightly coat the Pullman loaf pan with cooking spray. (even though it is nonstick, I prefer to lightly oil my pan.) Once risen, gently deflate the dough and using your hands press to flatten the dough and shape it into a rectangle just a bit wider than the Pullman loaf pan. Be careful not to overwork the dough, as this can lead to a denser texture. Roll it tightly while maintaining even tension to create a uniform shape.
- When shaping, use the base of your palm to press the dough into itself helping close up each seem. Finally, pinching the seem at the end and placing seem down into the pan.
- Cover the pan with plastic wrap and let the dough rise for another 6-12 hours, or until it reaches about 1/2 inch below the top edge of the pan. If the dough rises too much, it may overflow during baking, so keeping an eye on this final proof is important.
- Once risen, preheat your oven to 350°F. Place the lid on the Pullman loaf pan and bake for 35–40 minutes. If you prefer a golden crust, remove the lid during the last 5 minutes of cooking time.
- Using an instant-read thermometer, check for an internal temperature of about 190–200°F (88–93°C) to ensure the loaf is fully baked. If the loaf is underbaked, it may be gummy inside.
- Once baked, remove the loaf from the pan and let it cool completely on a wire rack before slicing. This ensures the texture stays light and fluffy. Cutting too soon can cause the loaf to dry out more quickly because of allowing the moisture to escape from the bread.
Notes
Use an active starter: This ensures a proper rise and good texture.
Be patient with fermentation: Sourdough takes longer to rise than commercial yeast bread, so allow ample time.
Maintain proper hydration: Too much flour can make the dough dense; aim for a slightly tacky feel.
Experiment with flavors: Try adding seeds, herbs, or a touch of honey for variations.
Whole wheat version: Use half whole wheat and half bread flour for a wheat version.
Plastic wrap: Use plastic wrap to help you see the progress of your dough. If you look at the photo above, I used the lid as my cover, but it rose to the lid and when I pulled it open to look, it deflated it some. I didn't notice that the dough had risen so much because I couldn't see in. Now I use plastic wrap during the rise so I can see when I need to add the lid and bake.